Perfect Sound from Any Headphones with AutoEq
Automatic headphone equalization powered by frequency response data. Generate optimized EQ presets for 700+ headphone models and load them into your favorite equalizer app.
Key Features
AutoEq processes raw headphone measurement data and generates optimized equalizer presets that bring any pair of headphones closer to a scientifically validated target curve.
Automatic EQ generation
Feed AutoEq a headphone’s frequency response measurement and it calculates the correction filters needed to match your chosen target curve. The entire optimization runs in seconds, removing hours of manual EQ tweaking from the process.
Parametric EQ optimizer
The optimizer outputs center frequencies, Q values, and gain settings for each filter band. You get a ready-to-load parametric EQ profile rather than a vague frequency chart, so there is no guesswork when configuring your equalizer app.
Multiple target curves
Choose from the Harman over-ear target, Harman in-ear target, or define your own custom curve. Each target represents a different tonal balance, and you can switch between them to find what sounds right to your ears.
700+ headphone database
AutoEq ships with measurement data from sources like oratory1990, Crinacle, Innerfidelity, and Rtings. That covers over 700 headphone and IEM models out of the box, with the community adding more regularly through pull requests.
Bass and treble preference controls
Shelf filters let you boost or cut bass and treble independently from the main EQ correction. If the Harman target sounds too bright or too bass-heavy for your taste, these sliders give you a way to adjust without breaking the overall curve shape.
Multi-format export
Export your generated EQ profile in formats compatible with Equalizer APO, Peace GUI, Wavelet (Android), EasyEffects (Linux), eqMac, and more. AutoEq handles the format conversion, so you copy one file and your equalizer app picks it up immediately.
Web application
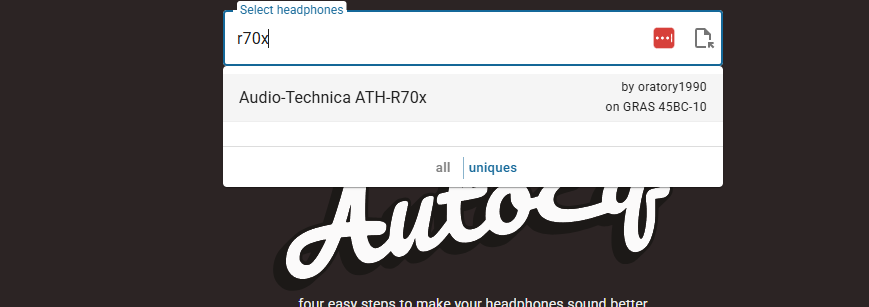
The autoeq.app web interface lets you search for your headphones, pick a target curve, adjust preferences, and download the EQ file without installing Python or cloning any repository. It runs entirely in your browser on any operating system.
Headphone simulation mode
Curious what your HD 600 would sound like with the frequency response of an LCD-X? AutoEq can generate a filter that transforms one headphone’s sound signature into another, useful for comparing models before you buy.
Convolution filter generation
For users who prefer FIR-based correction, AutoEq generates convolution WAV files. Load these into convolution engines like HeSuVi or Equalizer APO’s convolution module for phase-accurate frequency correction without parametric EQ limitations.
Custom measurement import
Have your own headphone measurements? Import frequency response data from CSV files and run the full optimization pipeline on them. This is useful for DIY headphone modders or anyone with access to a measurement rig like MiniDSP EARS.
Python library on PyPI
Install AutoEq via pip install autoeq and use it programmatically in your own scripts. The library exposes the same optimization engine as the CLI, making it straightforward to batch-process measurements or build custom tooling around it.
Open source and community-driven
Released under the MIT license with 15,500+ GitHub stars, AutoEq is free to use, modify, and distribute. The measurement database grows through community contributions, and the codebase accepts pull requests for new features and headphone data.
All features are free with no premium tier or subscriptions. Download AutoEq or use the web app to get started.
System Requirements
AutoEq runs as a Python package or through the web app. Here is what you need for each method.
| Component | Minimum | Recommended |
|---|---|---|
| Operating System | Windows 10 / macOS 11 / Ubuntu 20.04 | Windows 11 / macOS 14 / Ubuntu 22.04 |
| Python | Python 3.8 (64-bit) | Python 3.10.x (64-bit) |
| RAM | 2 GB | 4 GB or more |
| Disk Space | 500 MB (core package) | 5 GB (full measurement database) |
| Git | Required to clone the repository | Git 2.30+ |
| Dependencies | NumPy, SciPy, Matplotlib (via pip) | All dependencies + libsndfile |
| Display | 1024 x 768 | 1920 x 1080 (for frequency response graphs) |
| Component | Minimum | Recommended |
|---|---|---|
| Browser | Chrome 90+ / Firefox 88+ / Edge 90+ | Latest Chrome or Firefox |
| Internet | Stable connection required | Broadband for large datasets |
| Display | Any screen size (responsive) | 1280 x 720+ for comfortable graph viewing |
| Component | Minimum | Recommended |
|---|---|---|
| Android Version | Android 9.0 (Pie) | Android 12+ |
| App | Wavelet (free on Google Play) | Wavelet with AutoEq integration enabled |
If you run the Python CLI on Windows, you may need to install the Visual C++ Build Tools for compiling certain dependencies. The easiest path is to use the web app at autoeq.app, which requires no installation at all.
Already meet the requirements? Download AutoEq or try the web app instantly.
What is AutoEq?
Open-source headphone equalization based on actual frequency response measurements, not guesswork.
Measurement-based EQ for any headphones
AutoEq is a free, open-source tool that generates equalizer settings for headphones and IEMs. It works by comparing a headphone’s measured frequency response against a target curve (typically the Harman target) and computing the filter adjustments needed to close the gap. The result: your headphones reproduce audio closer to what the recording engineer intended.
Created by Jaakko Pasanen and maintained by 18 contributors on GitHub, AutoEq has earned over 15,500 stars since its first release. The project includes a database of measured frequency responses for more than 700 headphone models, sourced from oratory1990, Crinacle, Innerfidelity, and Rtings. If your headphones are in the database, you can have optimized EQ presets in under a minute.
How it works
AutoEq does not apply equalization itself. It generates configuration files that you load into a separate equalizer app. On Windows, that means Equalizer APO or Peace. On macOS, eqMac or SoundSource. On Linux, EasyEffects or PulseEffects. Android users can grab presets directly through the Wavelet app, which has AutoEq’s database built in.
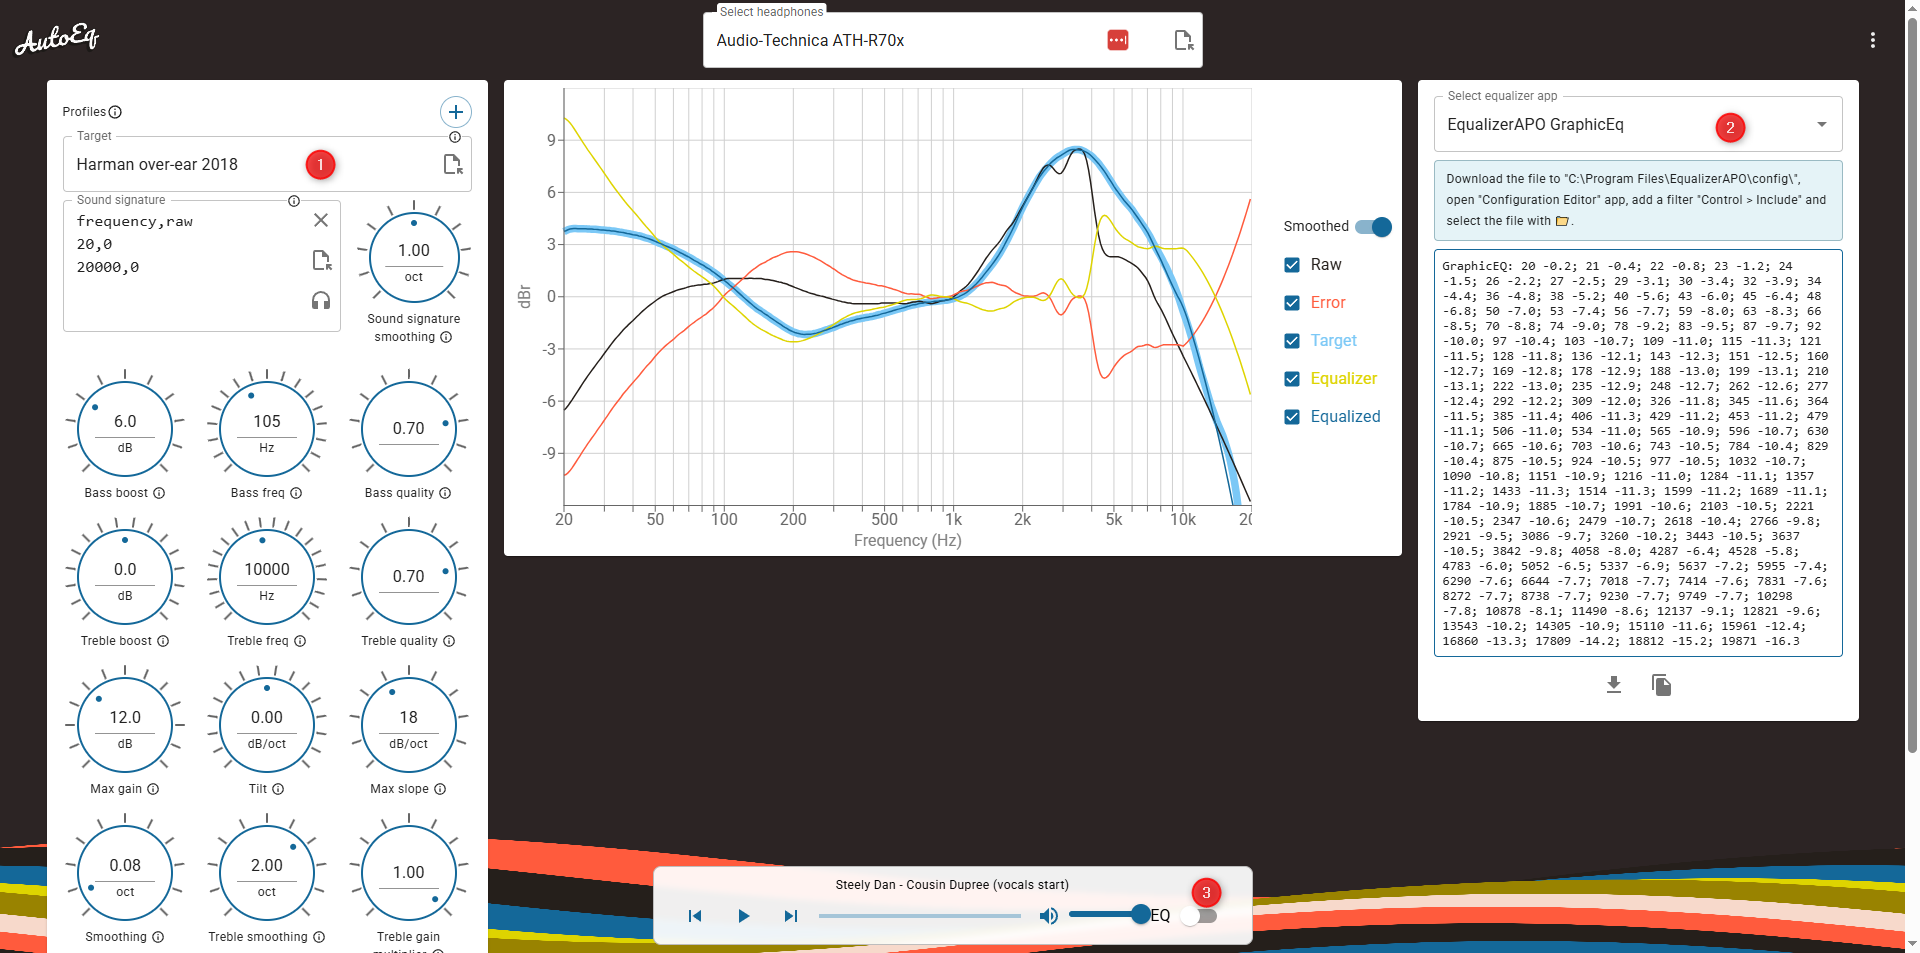
For those who prefer not to install anything, the autoeq.app web interface runs entirely in the browser. Pick your headphones, choose a target curve, adjust bass and treble to taste, and export. The parametric EQ optimizer calculates center frequencies, Q values, and gain for each filter band automatically.
Who uses AutoEq
The typical user is someone who bought headphones and wants them to sound better without spending more money. Budget headphones benefit the most — fixing a 10 dB treble peak or a rolled-off bass shelf can make a $50 pair sound noticeably closer to something three times the price. Audiophiles use it as a starting point and tweak by ear from there. Music producers use it to flatten monitoring headphones for mixing. The tool is MIT-licensed, so there are no restrictions on how you use the output.
AutoEq v4.0.0 supports Windows, macOS, Linux, and web browsers. Download AutoEq or try the getting started guide.
Download AutoEq
Get AutoEq through the web app, Python package, or source code. Pick the method that fits your setup.
AutoEq Web App
Open AutoEq Web AppSearch 700+ headphone models, generate EQ presets, and export to your equalizer app — all from the browser.
Windows
Install via pip. Requires Python 3.8-3.11 (64-bit). Export presets to Equalizer APO or Peace.
Download ZIPmacOS
Install via pip. Works on Intel and Apple Silicon. Export presets to eqMac or SoundSource.
Download TAR.GZLinux
Install via pip. Compatible with Ubuntu, Fedora, Arch. Export to EasyEffects or PulseEffects.
Download TAR.GZPyPI Package (v4.1.2)
Install with pip install autoeq — the simplest way to get the CLI tool. View on PyPI
Wavelet for Android
Uses AutoEq profiles natively. 5,000+ headphone presets built in. Get on Google Play
GitHub Repository
Clone the full repo for development or to access raw measurement data. View on GitHub
Git Clone
git clone https://github.com/jaakkopasanen/AutoEq.git
AutoEq is free, open-source software under the MIT license. For setup instructions, see Getting Started.
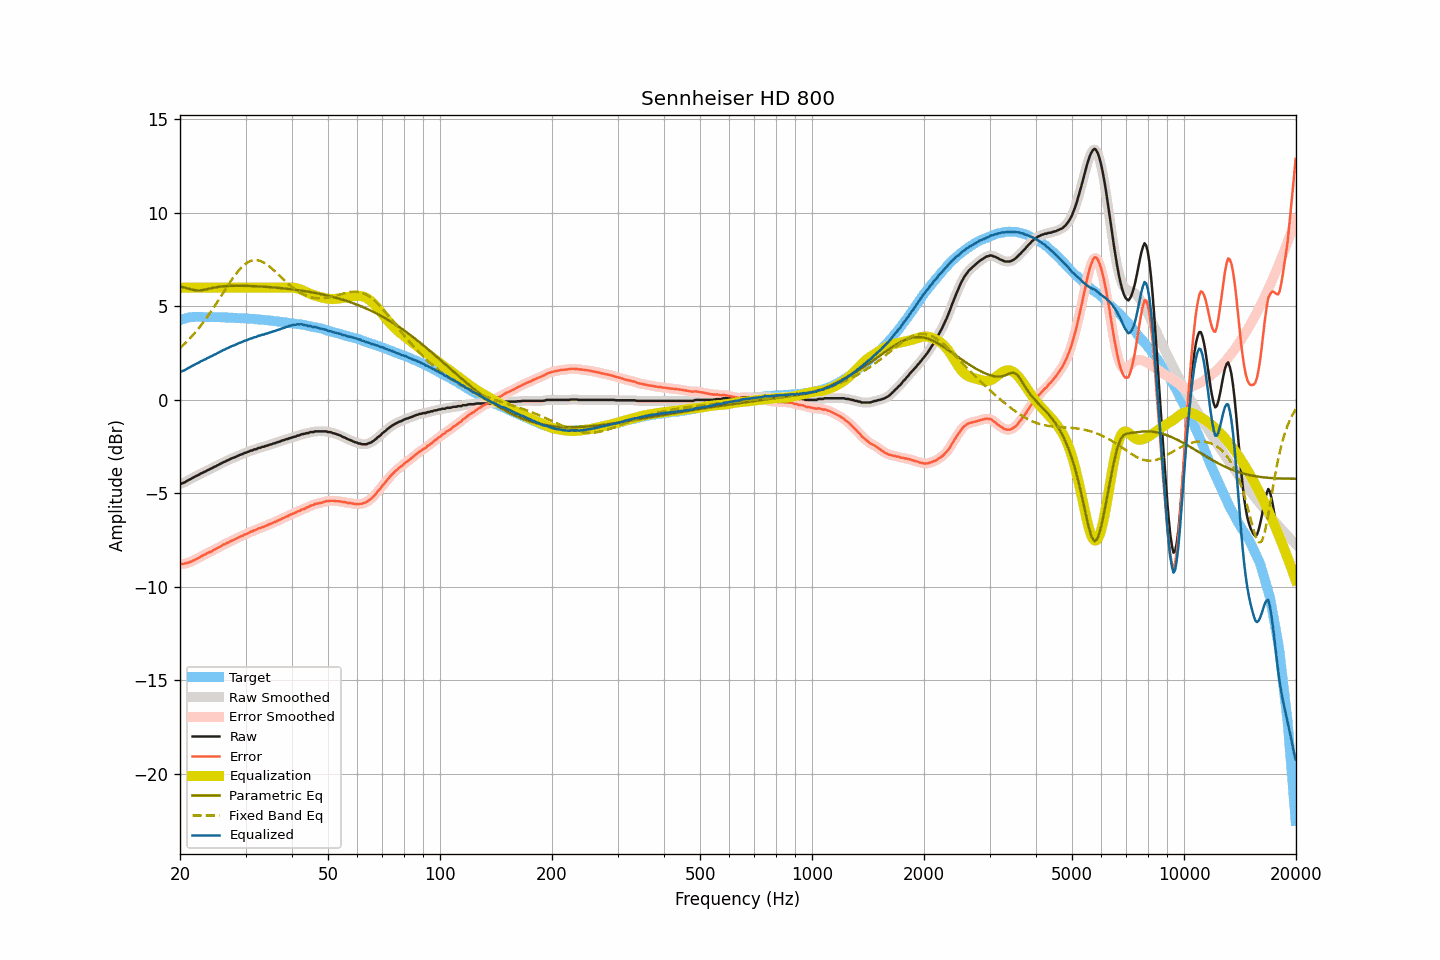
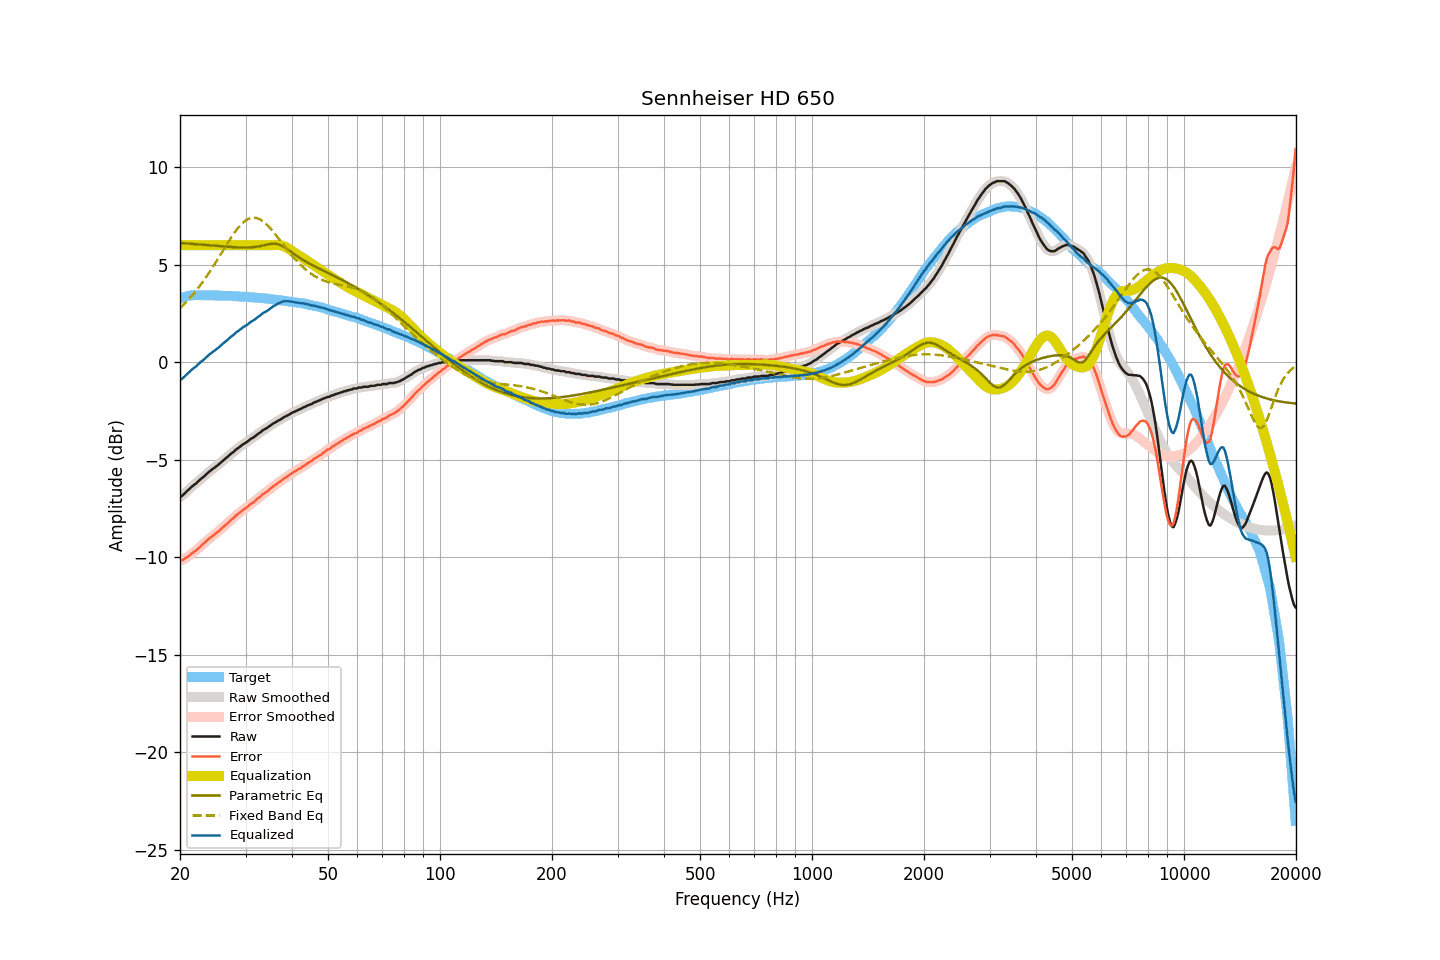
Screenshots
AutoEq frequency response graphs and the web app interface in action. Click any image to enlarge.
Frequently Asked Questions
Answers to common questions about AutoEq headphone equalization, from setup to advanced tuning.
Is AutoEq safe to download and use?
Yes, AutoEq is completely safe. It is an open-source project hosted on GitHub under the MIT license, with over 15,500 stars and 2,500 forks from the audio community. The entire source code is publicly auditable by anyone, and the project has been maintained by developer Jaakko Pasanen since 2018.
AutoEq does not install any background services, drivers, or system hooks on your computer. The Python CLI tool runs only when you execute it, and the web app at autoeq.app runs entirely in your browser. The generated EQ presets are plain text configuration files (containing frequency, gain, and Q values) that get loaded into separate equalizer applications like Equalizer APO or Peace. There is no executable binary to worry about — the tool is a Python package installed via pip from the official PyPI repository.
- Source code: fully open on GitHub (github.com/jaakkopasanen/AutoEq)
- No binary downloads needed for most users — the web app handles everything
- Output files are plain-text EQ configurations, not executable code
- 896+ commits and 18 contributors provide transparent development history
Pro tip: If you only need EQ presets for popular headphones, use the web app at autoeq.app. It requires zero installation and generates presets directly in your browser without downloading anything to your machine.
For more details on what AutoEq does, see our Features section.
Can EQ from AutoEq damage my headphones?
No, using AutoEq profiles will not damage your headphones under normal listening conditions. This is one of the most common concerns among new users, and audio engineers have addressed it repeatedly. The corrections AutoEq applies are typically small adjustments of 2-6 dB at specific frequencies, well within the operating range of any headphone driver.
AutoEq profiles include a negative preamp value (usually -3 to -8 dB) that reduces the overall signal level before applying boosts. This prevents digital clipping and keeps the output signal below 0 dBFS. Even if you EQ in a few extra dB of bass, the total energy reaching your drivers at normal listening volumes is nowhere near dangerous. Different songs already vary by 10-20 dB in bass content, and your headphones handle that without issue.
- Typical AutoEq corrections range from -6 dB to +5 dB per band
- Negative preamp prevents signal clipping and distortion
- At normal listening volumes (70-85 dB SPL), EQ adjustments pose zero risk
- The only theoretical danger would be adding extreme bass boost (+20 dB) at maximum volume, which AutoEq does not do
Pro tip: If you hear distortion after applying an AutoEq profile, increase the negative preamp value by 1-2 dB. This usually means the signal is clipping in your equalizer software, not that your headphones are in danger.
Check our Getting Started guide for proper setup instructions including preamp configuration.
Where is the official safe download for AutoEq?
The official sources for AutoEq are the GitHub repository (github.com/jaakkopasanen/AutoEq) and the web application at autoeq.app. There is no other official download site. Most users do not need to download anything at all since the web app generates EQ presets directly in the browser.
For the Python CLI tool, the official installation method is via pip from PyPI: pip install autoeq. The GitHub repository is the primary source for the full codebase, measurement data, and pre-computed results. The repository is roughly 4 GB because it contains frequency response measurement data for over 700 headphone models from sources including oratory1990, Crinacle, Rtings, and Innerfidelity.
- Web app (no download needed): autoeq.app
- Python package: pip install autoeq from PyPI
- Full source + data: github.com/jaakkopasanen/AutoEq
- Avoid third-party download sites — they may bundle unwanted software or serve outdated versions
Pro tip: If you just want EQ presets for a specific headphone, skip the Python install entirely. The web app at autoeq.app gives you the same results with a search bar and one-click export.
Head to our Download section for direct links to all official sources.
Does AutoEq work on Windows 11, macOS, and Linux?
Yes, AutoEq works on all three major desktop operating systems. The web app at autoeq.app runs in any modern browser (Chrome, Firefox, Edge, Safari) regardless of your OS. The Python CLI tool requires Python 3.8 through 3.11 (with 3.10.x recommended) and runs on Windows, macOS, and Linux.
What differs between platforms is which equalizer application you use to apply the generated presets. On Windows, Equalizer APO with the Peace GUI is the standard choice — it is free, system-wide, and supports parametric EQ. On macOS, options include eqMac (free, open source) and SoundSource ($39 from Rogue Amoeba). On Linux, EasyEffects (for PipeWire) or PulseEffects (for PulseAudio) handle the equalization. AutoEq exports presets in formats compatible with all of these applications.
- Windows: Equalizer APO + Peace GUI (free, system-wide)
- macOS: eqMac (free) or SoundSource ($39)
- Linux: EasyEffects (PipeWire) or PulseEffects (PulseAudio)
- Android: Wavelet app (uses AutoEq database natively)
- iOS: Limited — use web app to generate presets, apply via compatible music players
Pro tip: On Android, the Wavelet app from the Play Store has AutoEq built in. Just enable the AutoEq feature and search for your headphone model — no manual configuration needed.
See our System Requirements for detailed specifications per platform.
My headphones are not listed in AutoEq. What can I do?
AutoEq covers over 5,000 headphone and IEM models from multiple measurement databases, but not every model has been measured. If your specific headphones are missing, you have several practical options before giving up.
First, check all measurement sources in the web app. AutoEq pulls data from oratory1990, Crinacle, Rtings, and several other databases. Your headphone might be listed under a slightly different name or only in one particular database. Also check squig.link, which has additional IEM measurements from Crinacle and other contributors that may not all be in AutoEq yet.
- Try different name variations (e.g., “Sony WH-1000XM5” vs “WH1000XM5”)
- Check each measurement source individually — some headphones only appear in one database
- Look for a similar model in the same product line (e.g., use XM4 profile for XM5 as a starting point)
- If you have your own frequency response measurement (from a miniDSP EARS or similar rig), export it as CSV and use the Python AutoEq tool to generate a custom profile
- Request the headphone on the GitHub issues page — if someone has measurements, they may contribute them
Pro tip: Using a profile from a closely related model in the same product family often gets you 80% of the way there. Headphones within a series tend to share similar driver tuning characteristics.
Learn how to generate custom profiles in our Getting Started guide.
Does AutoEq work with Bluetooth headphones and wireless earbuds?
Yes, AutoEq works with Bluetooth headphones and wireless earbuds, though the method depends on your platform. The EQ is applied at the software level before audio is sent to the Bluetooth codec, so it corrects the frequency response regardless of the wireless connection.
On Windows, Equalizer APO processes audio system-wide, including Bluetooth output. On Android, the Wavelet app works with any audio output including Bluetooth — it sits in the audio pipeline between your apps and the Bluetooth codec. One caveat: Wavelet needs to detect which headphone is connected, and some Bluetooth devices report generic names that Wavelet cannot match to its database. In those cases, manually select the profile.
- Windows: Equalizer APO applies EQ to Bluetooth audio output automatically
- Android: Wavelet processes audio before Bluetooth encoding
- macOS: eqMac and SoundSource both work with Bluetooth devices
- Linux: EasyEffects works with any PipeWire audio sink including Bluetooth
Keep in mind that Bluetooth codecs (SBC, AAC, aptX, LDAC) introduce their own slight frequency response changes, but these are minor compared to the headphone driver’s inherent frequency response deviations. The AutoEq correction still makes a significant improvement even over Bluetooth.
Pro tip: If using Wavelet on Android and your Bluetooth headphones show up with a generic name, go to Wavelet settings and manually assign the correct AutoEq profile to that device.
For platform-specific setup, check our Getting Started guide.
Is AutoEq completely free to use?
Yes, AutoEq is 100% free and open source under the MIT license. There is no paid version, no premium tier, no subscription, and no feature gating. Every capability — the web app, the Python CLI tool, the full measurement database, and all pre-generated EQ presets — is available to everyone at no cost.
The MIT license is one of the most permissive open-source licenses available. It allows you to use, modify, and redistribute AutoEq for any purpose, including commercial use. The project relies entirely on community contributions and Jaakko Pasanen’s volunteer development. The measurement databases come from independent audio researchers (oratory1990, Crinacle, Rtings) who publish their data freely.
- Web app (autoeq.app): free, no account required
- Python CLI tool: free via pip install autoeq
- Pre-generated EQ presets: free on GitHub
- All 5,000+ headphone profiles: free to access and download
- Commercial use: permitted under MIT license
Pro tip: While AutoEq itself is free, the equalizer apps you load presets into may have their own pricing. Equalizer APO and Peace are free on Windows. On macOS, eqMac is free but SoundSource costs $39. On Android, Wavelet has a free tier with AutoEq support and a paid version ($2.49) for additional features.
Compare AutoEq to paid alternatives in our Features overview.
What is the difference between AutoEq and paid tools like Sonarworks SoundID?
AutoEq is free and open source, while Sonarworks SoundID Reference costs $99 to $249 per year depending on the plan. Both aim to correct headphone frequency response, but they differ in approach, measurement methodology, and features.
AutoEq generates parametric EQ corrections from community-sourced measurements (oratory1990, Crinacle, Rtings) and targets the Harman curve by default. Sonarworks uses its own proprietary measurements and its own target curve, and it includes a standalone system-wide app with DAW plugin integration. One area where Sonarworks pulls ahead is individual calibration — you can send your specific headphone unit to Sonarworks and they will measure it, accounting for unit-to-unit variation. AutoEq relies on a single sample measurement per model.
- AutoEq: Free, open source, 5,000+ models, multiple target curves, requires separate EQ app, community measurements
- Sonarworks SoundID: $99-249/year, ~500 models, proprietary target, built-in app + DAW plugin, individual unit calibration available
- Audio quality comparisons on forums suggest AutoEq targeting Harman 2018 is “slightly better” for general listening, while Sonarworks is easier to set up
- Sonarworks includes time-domain correction (phase), which AutoEq does not address
Pro tip: For most listeners, AutoEq with Equalizer APO provides results comparable to Sonarworks at zero cost. If you are a professional mixing/mastering engineer and need DAW integration with individual headphone calibration, Sonarworks may justify its price.
See all AutoEq capabilities on our Features page.
How do I use AutoEq with Equalizer APO on Windows?
Equalizer APO is the most popular way to apply AutoEq presets on Windows. It is a free, system-wide audio equalizer that processes all audio output, and it works with the Peace GUI for a friendlier interface. The setup takes about 5 minutes.
Equalizer APO version 1.3 or later works on Windows 10 and Windows 11 (64-bit). It installs as an Audio Processing Object that hooks into the Windows audio pipeline. Once installed, it automatically applies your EQ settings to all audio playing through the selected output device, whether that is speakers, wired headphones, or Bluetooth.
- Download and install Equalizer APO from its official site (equalizerapo.com)
- During installation, select the audio device(s) you want to equalize
- Restart your computer (required for the APO to load)
- Install Peace GUI (sourceforge.net/projects/peace-equalizer-apo-extension) for a visual interface
- Go to autoeq.app, search for your headphone model, and select Equalizer APO as the export format
- Copy the parametric EQ text and paste it into Peace, or save the GraphicEQ.txt file and import it via Equalizer APO’s Configuration Editor
Pro tip: The preamp value is included in the AutoEq output text. Equalizer APO applies it automatically when you import the config. Do not set a separate preamp in Peace if you already imported one from AutoEq — that would double the volume reduction.
For a full walkthrough, see our Getting Started guide.
How do I set up AutoEq on Android with Wavelet?
Wavelet is the easiest way to use AutoEq on Android. It is a free app on the Google Play Store that has AutoEq integration built in, covering thousands of headphone models. Setup takes under a minute for supported models.
Wavelet version 3.0 and later works on Android 9.0+ and processes audio system-wide using Android’s audio effects framework. It sits between your music app and the audio output, applying EQ corrections in real time. The app has a built-in AutoEq database that it updates periodically from the AutoEq project.
- Install Wavelet from the Google Play Store (free, with optional $2.49 premium)
- Open Wavelet and enable the AutoEq toggle
- Search for your headphone model name
- Select the correct model from the search results — Wavelet applies the correction immediately
- If your model is not in the built-in list, go to autoeq.app, export as Wavelet format, and import via Wavelet’s AutoEq settings
One thing to know: Wavelet’s built-in AutoEq processing has slightly lower resolution at bass frequencies compared to Equalizer APO on Windows. Users on Reddit and AudioScienceReview have noted that the bass shelf correction can amplify mid-bass slightly more than intended. For most listeners this difference is inaudible, but audiophiles who are sensitive to bass quality may notice a small discrepancy.
Pro tip: Enable Wavelet’s “Legacy mode” if the AutoEq effect stops working after a phone update. Some Android OEMs block the newer audio processing API, but the legacy mode works on almost every device.
See our Download section for links to Wavelet and other companion apps.
How do I install the AutoEq Python CLI tool?
The Python CLI tool is for advanced users who want to generate custom EQ profiles, use their own measurements, or automate the process. Most users should use the web app at autoeq.app instead, which provides the same results without any installation.
AutoEq version 4.0.0 requires Python 3.8 to 3.11 (64-bit). Python 3.10.x is recommended for the best compatibility with the numpy and scipy dependencies. The tool installs from PyPI using pip, though cloning the full GitHub repository (roughly 4 GB) gives you access to the complete measurement database and pre-generated results.
- Install Python 3.10.x from python.org (check “Add to PATH” during setup on Windows)
- Open a terminal and run: pip install autoeq
- For the full measurement database, clone the repo: git clone https://github.com/jaakkopasanen/AutoEq.git
- Install dependencies: cd AutoEq && pip install -r requirements.txt
- Run: python -m autoeq –help to see available commands and options
On Windows, you may need to install the Visual C++ Build Tools if scipy compilation fails. On Linux, install libsndfile1-dev via your package manager for audio file support. macOS typically works out of the box with the Xcode command-line tools installed.
Pro tip: Use a Python virtual environment (python -m venv autoeq-env) to avoid dependency conflicts with other Python projects on your system.
Detailed installation steps are in our Getting Started guide.
Why does my audio sound worse after applying AutoEq settings?
If AutoEq makes your audio sound worse rather than better, the most common cause is using the wrong measurement source for your headphone model. Each measurement database (oratory1990, Crinacle, Rtings) uses different equipment and methodology, producing slightly different results. Using a measurement that does not match your specific headphone revision can lead to overcorrection.
Other frequent causes include incorrect preamp settings (causing clipping/distortion), applying the EQ to the wrong audio output device in Equalizer APO, or unit-to-unit variation where your specific headphone sample differs from the measured unit. AutoEq corrects for the average frequency response of a model, but individual units can deviate by 2-3 dB at some frequencies.
- Wrong measurement source: Try switching between oratory1990, Crinacle, and Rtings profiles for your headphone
- Clipping distortion: Increase the negative preamp by 2-3 dB in your equalizer
- Wrong output device: In Equalizer APO Configurator, verify the correct device is selected
- Personal preference mismatch: The Harman target has a bass boost and mild treble emphasis that not everyone enjoys — try the “Diffuse Field” target for a flatter response
- High-frequency correction above 8 kHz: Measurement accuracy drops above 8 kHz due to coupler limitations — reduce those bands by 50% if treble sounds harsh
Pro tip: Use AutoEq as a starting point, then adjust individual bands by ear. Reducing the treble corrections above 6 kHz by half is a common tweak that many experienced users recommend, since high-frequency measurements are inherently less reliable.
Refer to our Getting Started guide for correct setup procedures.
Why does the AutoEq web app show different results each time?
This is a known behavior of the parametric EQ optimizer in AutoEq. The algorithm uses numerical optimization to find the best combination of filter parameters (frequency, gain, Q factor) to match the target curve, and this optimization process can converge on slightly different solutions each time depending on starting conditions.
The differences are typically small — less than 0.5 dB variation per band — and both results are equally valid approximations of the ideal correction. Parametric EQ with a limited number of bands (usually 5-10) cannot perfectly replicate the target curve at every frequency, so there are multiple “good enough” solutions. The optimizer finds whichever one it reaches first.
- Variations between runs are typically under 0.5 dB per band
- Both results are valid corrections — neither is “more correct”
- The issue is tracked on GitHub (issues #1022, #718)
- Using more EQ bands reduces the variation since there are fewer equivalent solutions
Pro tip: If consistency matters to you, generate the profile once, save the exported file, and reuse it. The pre-generated results in the GitHub repository are deterministic since they were computed once and stored as static files.
Learn about the different EQ export formats on our Features page.
AutoEq preamp makes my audio too quiet. Can I change it?
Yes, you can reduce the negative preamp, but do so carefully. The negative preamp exists to prevent digital clipping. When AutoEq boosts certain frequency bands (say +5 dB at 2 kHz), the total signal can exceed 0 dBFS, causing harsh distortion. The preamp lowers the entire signal before the EQ boosts, keeping everything below the clipping threshold.
If your listening volume is low enough that the boosted frequencies will not clip, you can safely reduce the negative preamp. In Equalizer APO / Peace, the preamp is usually the first line in the configuration. A typical AutoEq profile might set it to -6.5 dB. You could change it to -3 dB or even 0 dB as long as you do not hear distortion at your normal volume.
- Check for clipping: play bass-heavy music at your normal volume, listen for crackling or harshness
- If no distortion, reduce the preamp by 1-2 dB at a time
- In Peace GUI: adjust the “Pre Amplifying” slider
- In Wavelet: the preamp cannot be adjusted separately — it is built into the profile
- The volume drop is most noticeable with headphones that already have a quiet output level
Pro tip: If the volume reduction bothers you, compensate by increasing your system or amp volume. The preamp ensures the digital signal stays clean — analog volume increase after the EQ is perfectly safe and is the correct approach.
See our Getting Started guide for proper preamp configuration.
How do I update AutoEq to the latest version?
How you update depends on which version of AutoEq you use. The web app at autoeq.app always serves the latest version automatically — no action needed on your part. For the Python CLI tool, run pip install –upgrade autoeq in your terminal. The current version is 4.0.0, released October 29, 2023.
If you cloned the full GitHub repository, update by pulling the latest changes: cd AutoEq && git pull. This updates both the tool code and the measurement database. New headphone measurements get added as contributors submit them, so pulling periodically ensures you have the latest profiles. The repository is roughly 4 GB, so the initial clone takes time but subsequent pulls are incremental.
- Web app: Always up to date — just reload autoeq.app
- Python CLI: Run pip install –upgrade autoeq
- GitHub clone: Run git pull in the AutoEq directory
- Wavelet (Android): The app updates its built-in AutoEq database through Play Store updates
- Check the GitHub releases page for changelogs and new features
Pro tip: After updating, regenerate your EQ preset even if your headphone model has not changed. Updated measurement data or algorithm improvements in newer versions may produce better results than your old preset.
Get the latest version from our Download section.
AutoEq vs oratory1990 presets – which should I use?
Both are excellent, and the community is split on this. The key difference: oratory1990 manually measures headphones on professional GRAS 43AG equipment, hand-tunes the EQ presets, then re-measures the headphone with EQ applied to verify the correction. AutoEq runs an automated algorithm on raw measurement data to generate corrections without human verification.
Oratory1990’s presets cover fewer models (roughly 400 vs AutoEq’s 5,000+) but each preset has been validated by a professional audio engineer. His measurements are considered the gold standard in the headphone community, and his presets often include subtle adjustments that the algorithm misses. AutoEq has broader coverage and offers more target curve options, but the corrections have not been verified by listening tests.
- oratory1990: ~400 models, hand-tuned, verified by re-measurement, published as PDFs on Reddit r/oratory1990
- AutoEq: 5,000+ models, algorithmically generated, multiple measurement sources and target curves
- If oratory1990 has measured your headphone, his preset is generally the safer bet
- If your headphone is not in oratory1990’s list, AutoEq is your best free option
- Many experienced users start with oratory1990’s preset if available, then compare with AutoEq’s output
Pro tip: You can use oratory1990’s measurements as the source data within AutoEq and then apply a different target curve than what oratory recommends. This combines the best measurements with your preferred tuning target.
Learn about AutoEq’s measurement sources on our Features page.
What is the difference between Graphic EQ and Parametric EQ in AutoEq?
Parametric EQ is the preferred format and what most users should choose. It uses a set of individually tunable filter bands (typically 5-10) where each band has three parameters: center frequency, gain, and Q factor (bandwidth). Graphic EQ uses fixed frequency bands (usually 31 or 127 points) with adjustable gain only. Both formats are available in AutoEq.
Audio engineer oratory1990 has confirmed that “a 10-band parametric EQ is certainly better than a 10-band graphic EQ” because parametric allows precise control over the bandwidth of each correction. A narrow Q value can surgically address a resonance peak without affecting nearby frequencies, while graphic EQ bands are locked to fixed positions and widths. With 127 bands, graphic EQ gets visually closer to the target but introduces more artifacts from band interaction.
- Parametric EQ: 5-10 bands, adjustable frequency/gain/Q, more precise, preferred by audiophiles
- Graphic EQ: 31 or 127 fixed bands, gain only, simpler to visualize, more compatible with basic equalizers
- Use parametric with: Equalizer APO/Peace, Wavelet, Qudelix, Roon, Poweramp
- Use graphic with: apps that lack parametric support (some media players, basic system EQs)
AutoEq also generates convolution filters (FIR) which provide the most accurate correction possible, but require more CPU and specific software support. Convolution is best for studio/critical listening scenarios.
Pro tip: If your equalizer supports it, request 10 parametric bands from AutoEq rather than the default 5. More bands produce a closer match to the target curve with less residual error.
See all export options in our Features section.
Which AutoEq target curve should I choose for my headphones?
The default Harman target curve is the best starting point for most users. Harman International developed this target through extensive preference research with hundreds of listeners. AutoEq uses Harman 2018 for over-ear headphones and Harman 2019v2 for in-ear monitors by default.
The Harman target is not flat — it includes a bass boost of about 4-6 dB below 200 Hz and a mild ear canal resonance compensation around 3 kHz. This matches what the average person prefers when listening to music on headphones. If you prefer less bass, try the IEF Neutral target (Crinacle’s neutral preference) or the Diffuse Field target (flatter, brighter). If you want more bass, add a low-shelf filter on top of the Harman correction.
- Harman 2018 (over-ear): Warm bass, smooth treble — most popular choice, good for all genres
- Harman 2019v2 (in-ear): Default for IEMs, slightly different bass shelf to account for ear tip seal
- IEF Neutral (Crinacle): Less bass than Harman, neutral midrange, detailed treble
- Diffuse Field: Analytical, flat, bright — preferred by some classical and jazz listeners
- Custom targets: upload your own CSV file to the Python tool or use squig.link
Pro tip: Try Harman first for a week before switching targets. Your ears need time to adjust to a corrected frequency response. Many users initially dislike the Harman correction because they are accustomed to their headphone’s stock tuning, then grow to prefer it after the adjustment period.
Read about all target curve options on our Features page.
How do I add bass boost to my AutoEq profile?
The easiest way is through the AutoEq web app at autoeq.app, which includes a bass boost slider directly in the interface. Adjust it to your preference and the EQ profile regenerates with the additional bass shelf included. For manual control, add a low-shelf filter in your equalizer app after applying the AutoEq preset.
A typical bass boost for headphones uses a low-shelf filter at 105 Hz with a gain of +3 to +6 dB and a Q value of approximately 0.7. This adds warmth to the sub-bass and bass region without muddying the midrange. Remember to decrease the preamp by the same amount as your bass boost to prevent clipping — if you add +4 dB of bass, subtract an additional 4 dB from the preamp.
- Generate your base AutoEq profile (with or without the web app’s bass slider)
- Load it into your equalizer (Equalizer APO, Peace, Wavelet, etc.)
- Add a new filter: Type = Low Shelf, Frequency = 105 Hz, Gain = +3 to +6 dB, Q = 0.7
- Reduce the preamp by the same dB amount you added
- Listen and adjust gain to taste — start low and increase gradually
Pro tip: The Harman target already includes a 4-6 dB bass boost. If you want even more bass on top of that, keep the additional shelf under +5 dB to avoid driver distortion in bass-heavy passages. Also use squig.link where you can visually compare your modified target to the original before generating the profile.
Check our Getting Started guide for full EQ customization instructions.
Getting Started with AutoEq
A hands-on walkthrough for making your headphones sound better in under 10 minutes, whether you prefer the web app or the Python CLI.
Downloading AutoEq
AutoEq gives you two paths. The fastest is the web app at autoeq.app, which runs in any modern browser and requires zero installation. You search for your headphone model, pick an equalizer format, and download a preset file. Done.
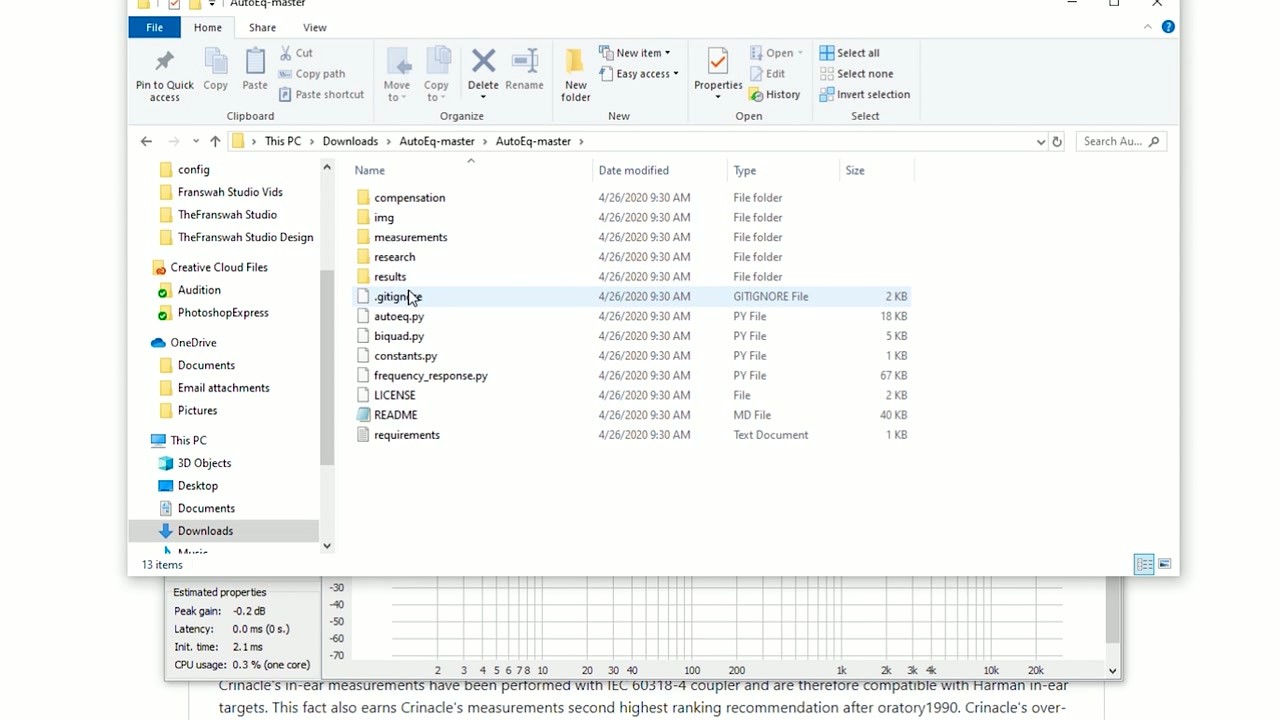
If you want more control – custom target curves, batch processing, or importing your own measurements – grab the full Python CLI. Head to our download section and get the repository archive (about 4 GB because it bundles measurement data for 700+ headphones). The archive is a .zip file; extract it wherever you like.
For the Python route, you will need Python 3.8 through 3.11 installed on your system. Python 3.10 is the safest bet. Make sure to check “Add Python to PATH” during installation if you are on Windows.
Installing the Python CLI
After extracting the archive, open a terminal (Command Prompt or PowerShell on Windows, Terminal on macOS/Linux) and navigate to the AutoEq folder.
Set up a virtual environment first. This keeps AutoEq’s dependencies isolated from other Python projects on your machine:
Activate it:
- Windows:
venvScriptsactivate - macOS / Linux:
source venv/bin/activate
Then install AutoEq and its dependencies (numpy, scipy, matplotlib):
Verify everything works by running:
You should see a list of command-line options. If Python throws an error about missing libsndfile, install it through your system package manager (brew install libsndfile on macOS, apt install libsndfile1 on Ubuntu).
You can also install AutoEq from PyPI without cloning the full repository:
This method skips the 4 GB measurement data download. You will still need to provide your own measurement files or use the pre-computed results from GitHub.
Setting Up Your Equalizer App
AutoEq generates preset files, but you need a separate equalizer app to actually apply them to your audio output. Here is what to install depending on your platform:
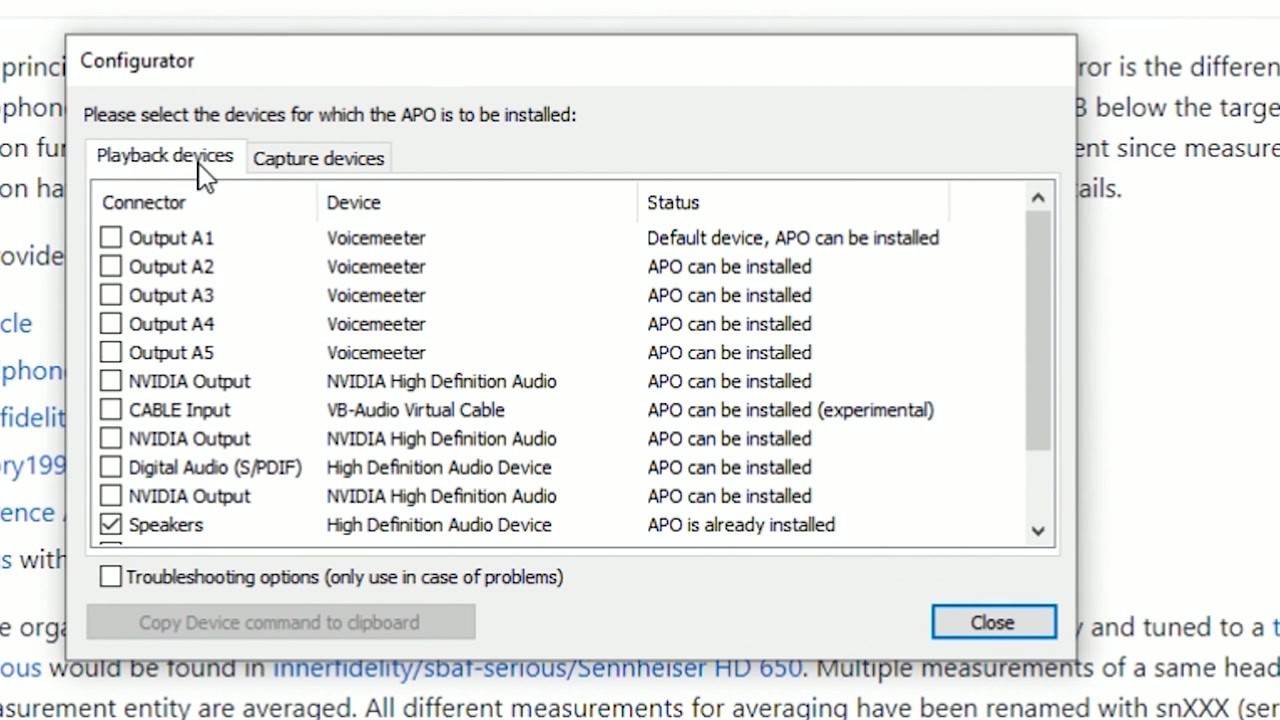
Windows: Install Equalizer APO (free, system-wide). During installation, the Configurator window appears – check the box next to your headphone’s audio device (usually “Speakers” or your DAC name). You must reboot after installation.
For a friendlier GUI, add Peace on top of Equalizer APO. Peace is a graphical front-end that makes importing AutoEq presets much easier.
Android: Install Wavelet from the Play Store. Wavelet has AutoEq’s database built in – just search your headphone model inside the app and toggle it on. No file importing needed.
Linux: Install EasyEffects (for PipeWire) or PulseEffects (for PulseAudio). Both support importing AutoEq ParametricEQ.txt presets directly.
macOS: Use eqMac (free) or SoundSource ($39, more polished). Both accept parametric EQ values that you can type in manually from AutoEq’s output.
Your First EQ Profile: A Real Example
Let’s walk through equalizing a pair of HyperX Cloud Stinger headphones using the web app and loading the result into Equalizer APO on Windows.
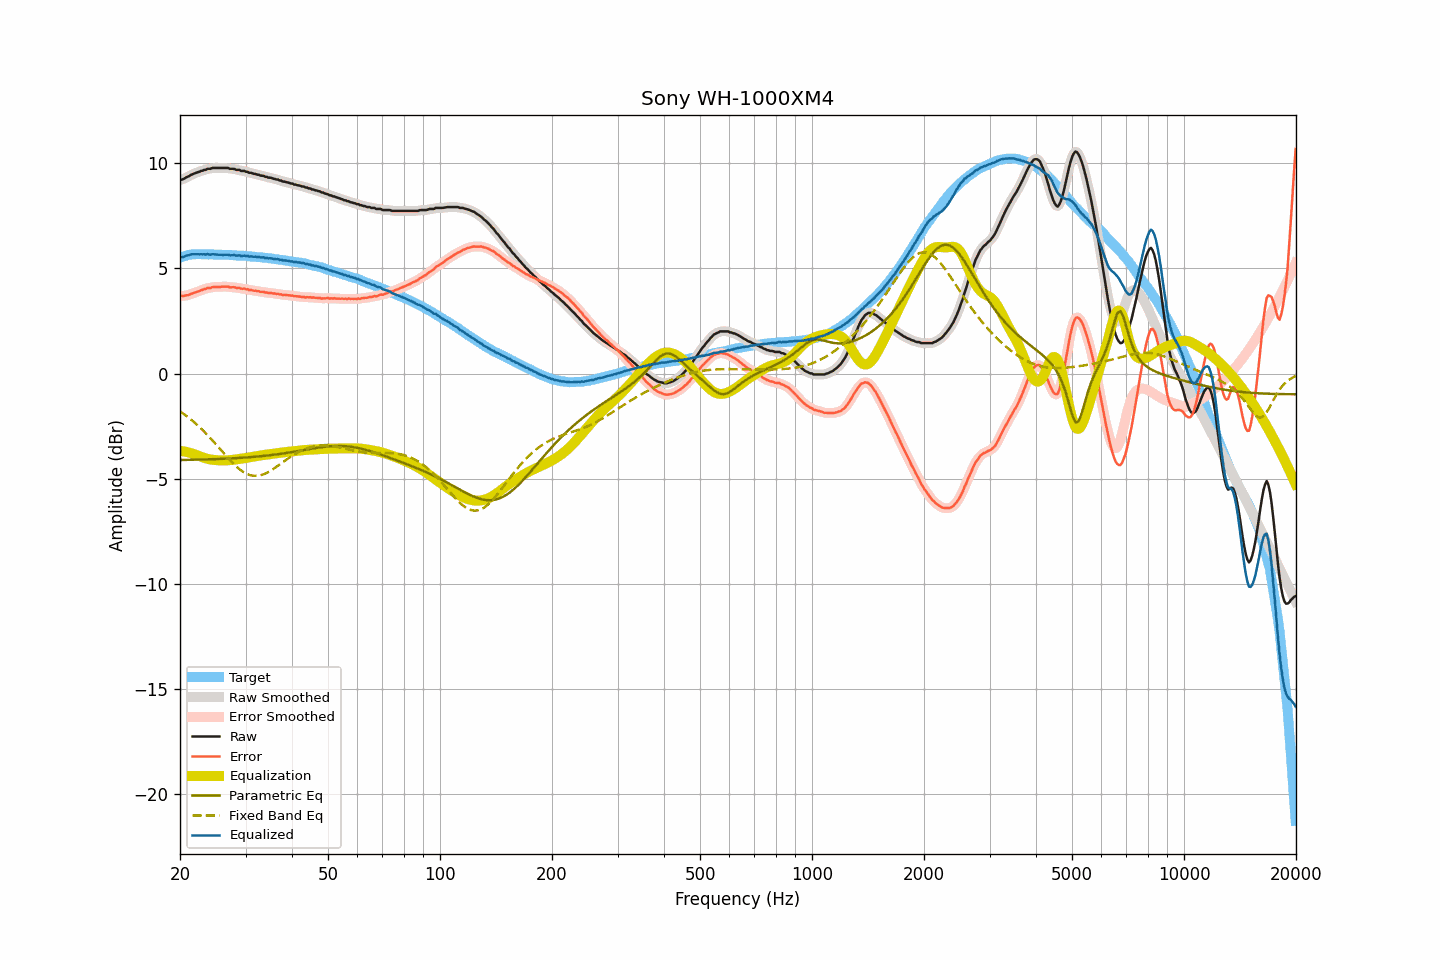
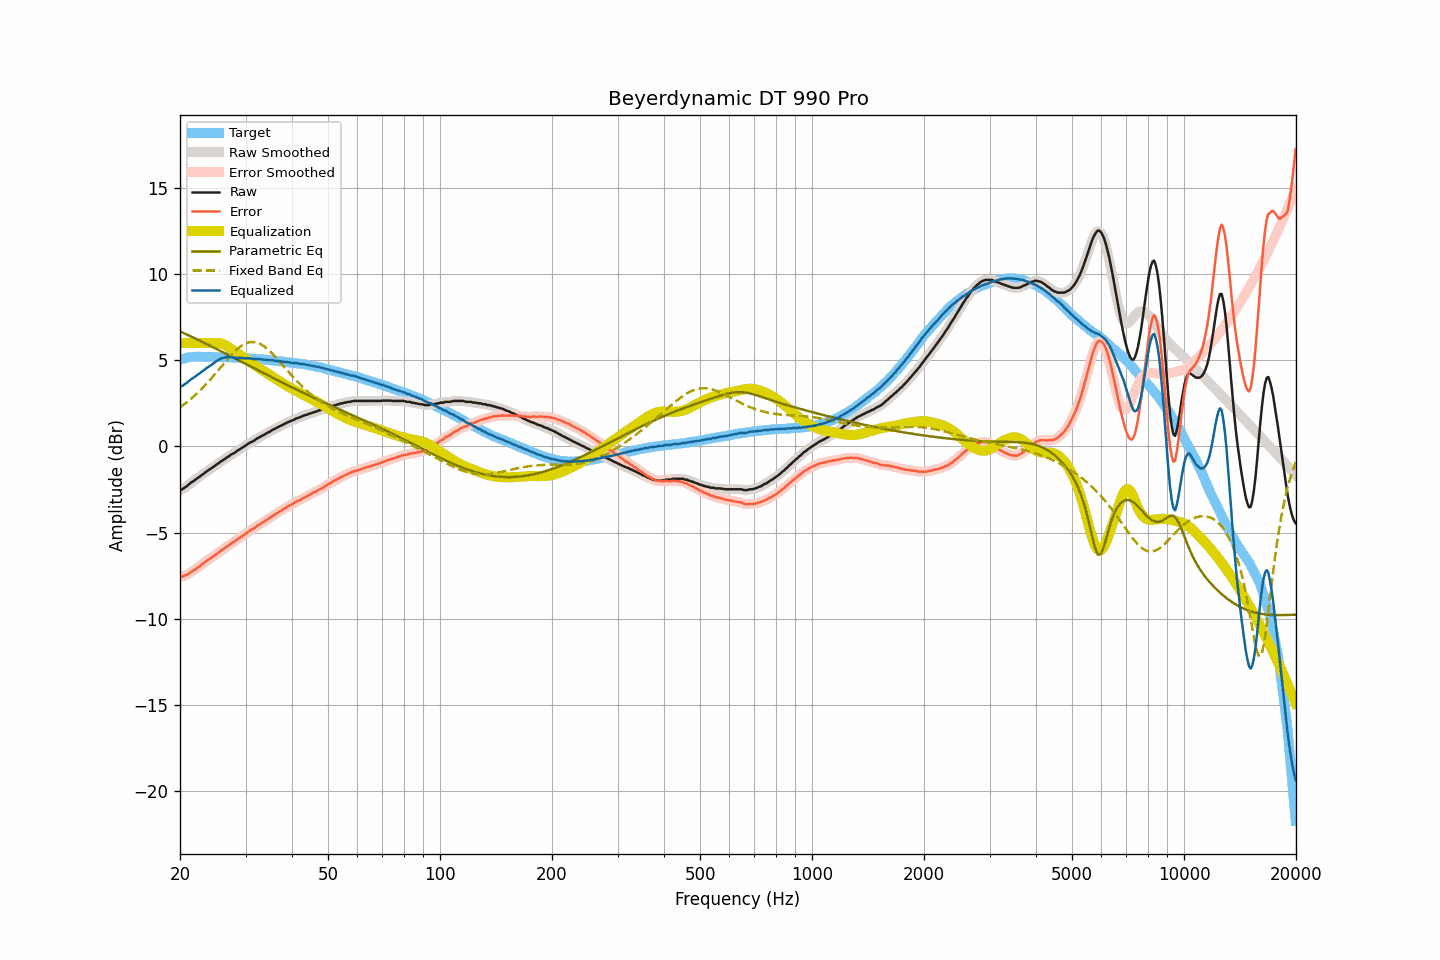
- Go to autoeq.app and type “HyperX Cloud Stinger” into the search bar. Select it from the dropdown.
- The app shows three colored curves on a frequency response graph: the raw measurement (orange), the target curve (blue, usually Harman), and the corrected result (green). The green line should sit close to the blue one.
- Under the graph, pick your equalizer format. Select “Equalizer APO” if you are on Windows. Click “Download.”
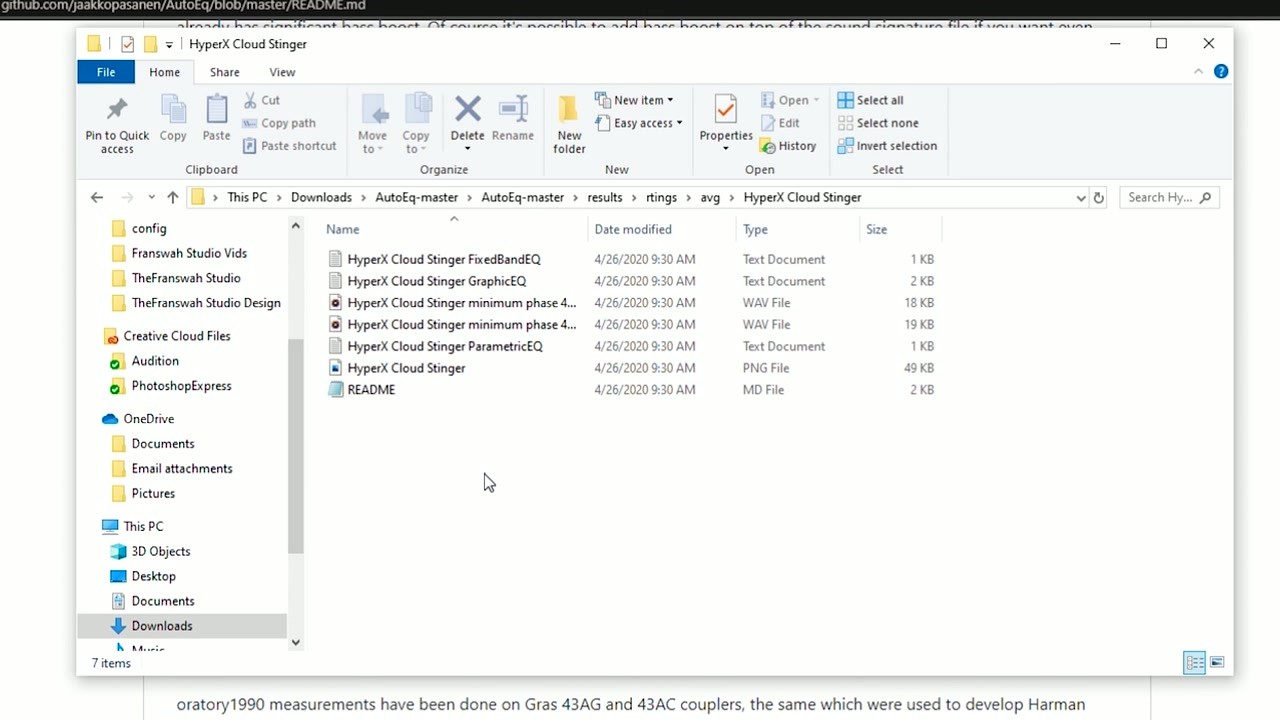
- You will get a file called something like
HyperX Cloud Stinger ParametricEQ.txt. Copy this file toC:Program FilesEqualizerAPOconfig.
The preset file contains a list of parametric EQ bands with frequency, gain, and Q values. A typical output has 5-10 bands that look like this:

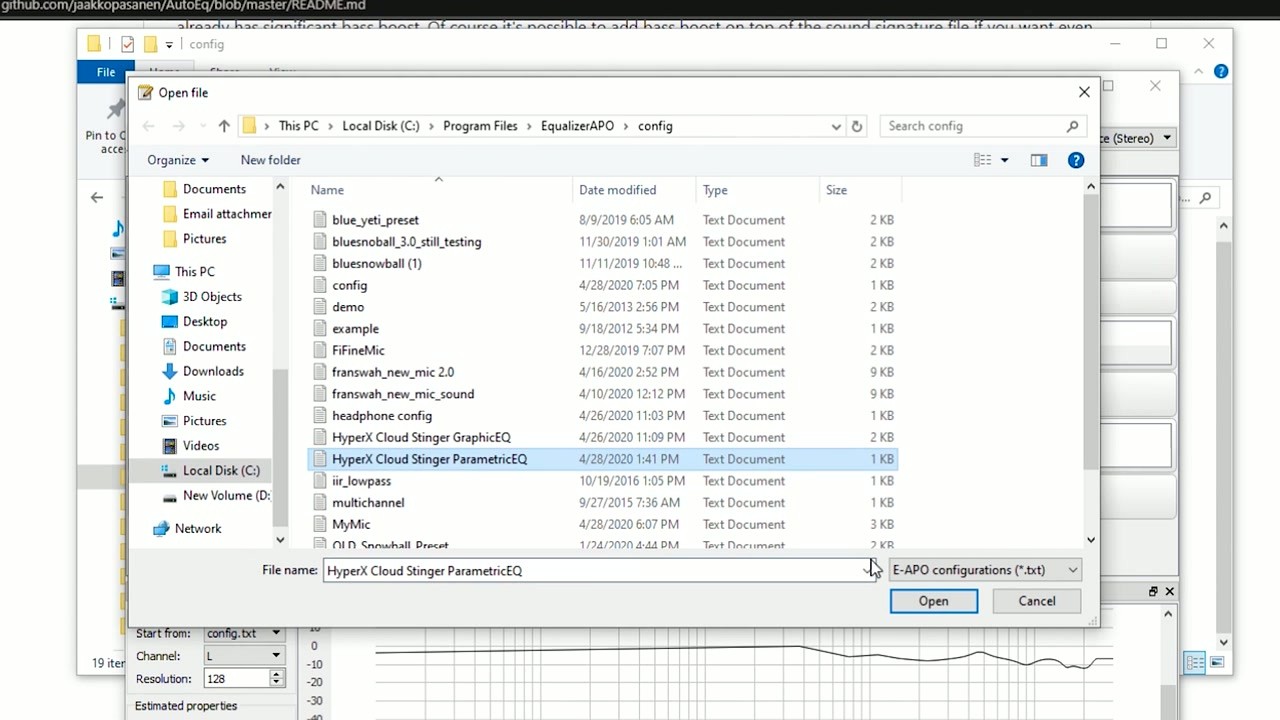
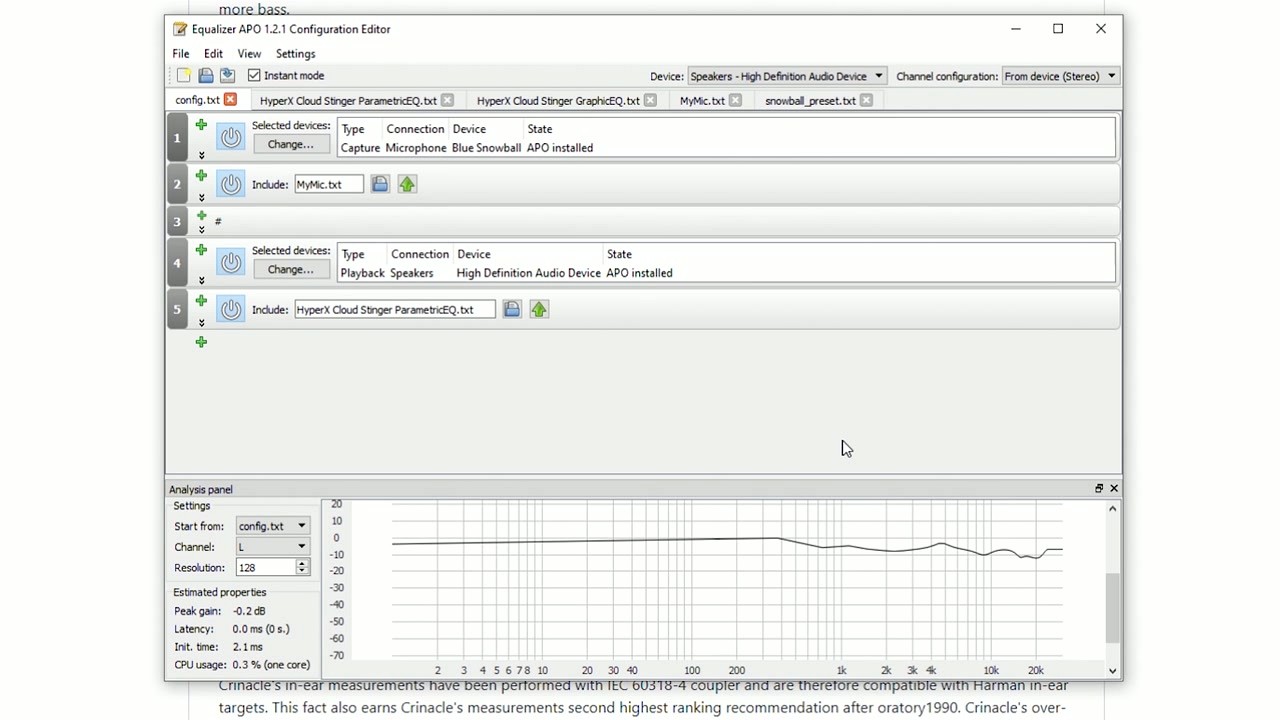
- Open Equalizer APO’s Configuration Editor (Editor.exe). Click the green + button, select “Include”, and browse to the ParametricEQ.txt file you just downloaded.
- Set the preamp value. Check the README file that came with your preset – it will say something like “apply preamp of -6.9 dB.” In the Editor, add a Preamp filter at the top and set it to that value. This prevents audio clipping.
Play some music. You should hear the difference right away – tighter bass, clearer mids, less harsh treble. The change can be dramatic on budget headphones.
Using the Python CLI for Custom EQ
The CLI gives you options the web app does not have. You can specify custom target curves, use your own measurements, and batch-process multiple headphones at once.
To generate EQ for a headphone using built-in measurements:
This creates several output files in your results folder:
- ParametricEQ.txt – For Equalizer APO, Peace, EasyEffects
- GraphicEQ.txt – For graphic equalizers (127-band)
- FixedBandEQ.txt – For 10-band graphic EQs
- *.wav – Convolution filter files for FIR-based equalizers
To target a custom sound signature instead of the default Harman curve, use the --compensation flag:
Your custom target should be a CSV file with two columns: frequency (Hz) and amplitude (dB).
Tips and Best Practices
Always set preamp. AutoEq boosts certain frequencies, which can cause distortion if total volume exceeds 0 dB. The preamp value in each preset’s README is there for a reason. Skipping it is the most common beginner mistake.
Prefer oratory1990 measurements. AutoEq includes data from multiple sources (Crinacle, Rtings, Innerfidelity, oratory1990). The oratory1990 measurements use professional-grade Gras 43AG couplers and produce the most accurate results. If your headphone has an oratory1990 entry, pick that one.
Use AutoEq as a starting point. The generated presets get you 80-90% of the way there. After applying a preset, listen for a few hours, then make small adjustments by ear. Bumping the bass shelf up by 2-3 dB is the most popular tweak people make.
Wavelet users, check “AutoEq” in the app. On Android, Wavelet has AutoEq profiles baked right in. Tap the toggle, search your headphone, and you are done. No file downloads needed.
Where to get help: The AutoEq wiki on GitHub covers advanced topics like custom targets and headphone simulation. For community troubleshooting, check r/headphones and r/oratory1990 on Reddit.
Keep presets updated. New headphone measurements get added regularly. Star the GitHub repository to get notified when version 4.x releases drop, or re-download from the web app periodically – it always uses the latest data.
Ready to hear the difference? Download AutoEq and try it with your headphones today.